Hey there! As a supplier of Wonhwang Pears, I'm super excited to share with you the amazing process of making Wonhwang Pear jam. It's not only a delicious treat but also a great way to preserve these juicy pears for longer.
Getting the Right Pears
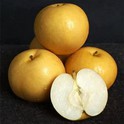
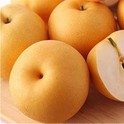
First things first, you need to start with high - quality Wonhwang Pears. These pears are known for their sweet flavor, firm texture, and beautiful golden - yellow color. As a supplier, I make sure that the pears I provide are at their peak ripeness. You want pears that are just slightly soft to the touch but still hold their shape well.
There are other pear varieties out there too, like Snow Pear, 20th Century Asian Pear, and Hosui Asian Pears. But in my opinion, Wonhwang Pears are just perfect for making jam because of their balanced sweetness and the way they cook down to a lovely consistency.
Gathering Your Ingredients
Once you've got your Wonhwang Pears, you'll need a few other things. You'll need sugar, which helps to preserve the jam and adds that extra sweetness. A general rule of thumb is to use about half as much sugar as the weight of the pears. So, if you have 1 kg of pears, you'll need around 500 grams of sugar.
You'll also need a bit of lemon juice. Lemon juice not only adds a nice tart flavor but also helps to prevent the pears from browning and acts as a natural preservative. Just about 2 - 3 tablespoons of fresh lemon juice for every 1 kg of pears should do the trick. And of course, you'll need a big pot to cook the jam in and some jars to store it.


Preparing the Pears
Now, it's time to prep the pears. Start by washing them thoroughly under running water to get rid of any dirt or debris. Then, peel the pears. You can use a vegetable peeler for this. After peeling, cut the pears in half and remove the cores. You can use a paring knife to do this. Just cut around the core and scoop it out.
Once the pears are peeled and cored, cut them into small pieces. The size of the pieces doesn't really matter too much, but smaller pieces will cook down faster. You can cut them into cubes or slices, whatever you prefer.
Cooking the Jam
Put the cut pears into your big pot. Add the sugar and lemon juice. Give it all a good stir so that the sugar is evenly distributed among the pears. Let the mixture sit for about 30 minutes. During this time, the sugar will draw out the juices from the pears, creating a nice syrupy liquid.
Now, it's time to start cooking. Place the pot on the stove over medium - high heat. Bring the mixture to a boil, stirring constantly to make sure the sugar doesn't burn. Once it starts boiling, reduce the heat to low and let it simmer. Stir occasionally to prevent the jam from sticking to the bottom of the pot.
As the jam simmers, you'll notice that the pears start to break down and the liquid thickens. This process can take anywhere from 30 minutes to an hour, depending on how much jam you're making and how thick you want it to be. You can test the consistency by taking a small spoonful of the jam and letting it cool for a few seconds on a plate. If it thickens up and doesn't run off the spoon too easily, it's ready.
Sterilizing the Jars
While the jam is cooking, it's a good idea to sterilize your jars. You can do this by washing the jars and lids in hot, soapy water. Then, rinse them well and place them in a pot of boiling water for about 10 minutes. Make sure the jars are completely submerged in the water. After 10 minutes, carefully remove the jars from the water using tongs and let them dry on a clean towel.
Filling the Jars
Once the jam is at the right consistency, it's time to fill the jars. Use a ladle to carefully pour the hot jam into the sterilized jars, leaving about 1/4 inch of headspace at the top. This headspace allows for expansion as the jam cools.
After filling the jars, wipe the rims clean with a damp cloth to remove any jam that might have spilled. Then, place the lids on the jars and tighten them securely.
Canning the Jam
To make sure your jam lasts a long time, you can process the jars in a water bath canner. Fill a large pot with water and place a rack at the bottom to prevent the jars from touching the bottom of the pot. Carefully lower the filled jars into the water using a jar lifter. Make sure the water covers the jars by at least 1 - 2 inches.
Bring the water to a boil and let the jars boil for about 10 - 15 minutes. This process helps to create a vacuum seal in the jars, which keeps the jam fresh. After the boiling time is up, carefully remove the jars from the water using the jar lifter and let them cool on a towel. As the jars cool, you'll hear a popping sound, which means the lids have sealed properly.
Storing and Enjoying the Jam
Once the jars are completely cool, check the seals. You can do this by pressing on the center of the lid. If it doesn't move or pop, the seal is good. Store the sealed jars in a cool, dark place like a pantry. The jam should last for several months.
Now, it's time to enjoy your Wonhwang Pear jam! You can spread it on toast, use it as a filling for pastries, or even mix it into yogurt. It's so versatile and delicious.
If you're interested in sourcing high - quality Wonhwang Pears for your own jam - making adventures or for other culinary uses, don't hesitate to reach out. I'm always here to help you with your procurement needs. Whether you're a home cook looking for a small batch or a business in need of a larger supply, I've got you covered.
References
- "The Joy of Jamming: A Guide to Making Homemade Jams and Preserves" by Jane Smith
- "Fruit Preservation: Techniques for Keeping Your Harvest Fresh" by Tom Johnson